Monday, July 30, 2012
Broccoli Pierogie Bake
We used to eat pierogies all the time. I'm not sure what changed. I think SP decided he was tired of them so I stopped buying them. A few months ago I saw Christina from Tales from a Mad Men Kitchen make this Bacon Pierogie Bake twice in a matter of weeks. She recommended adding broccoli, which I can't believe I didn't think of myself considering I served steamed broccoli with this the last time I made it, not to mention I used to serve broccoli with pierogies all the time.
I decided to leave out the bacon in order to make this mostly vegetarian (I still used chicken broth so it's not a true vegetarian meal). I was a little worried when I opened the package of pierogies and there were only 12 of them, but the broccoli made this a filling meal. I love the flavors, especially the tomato and green onions mixing with the cream cheese sauce. Baby Girl loved this dish, proclaiming it "yummy, yummy in my tummy."
Broccoli Pierogie Bake
From Cooking Light, as seen on Tales from a Mad Men Kitchen
1 (16-ounce) package frozen potato and onion pierogies (such as Mrs. T's)
Cooking spray
2 broccoli crowns, cut into florets
1 teaspoon olive oil
2 garlic cloves, minced
3 ounces cream cheese
1/2 cup chicken broth (or vegetable broth)
2 ounces shredded sharp cheddar cheese
1/4 cup thinly diagonally sliced green onions
1/4 cup chopped seeded plum tomato
1/2 teaspoon freshly ground black pepper
Preheat oven to 400°.
Steam broccoli until tender. Coat an 11 x 7 baking dish with cooking spray. Arrange the broccoli and frozen pierogies in the dish.
Heat olive oil in a skillet over medium heat. Add garlic and cook for 30 seconds, stirring constantly. Add cream cheese to pan, and cook for 1 minute or until cream cheese begins to melt, stirring frequently. Gradually add chicken broth to pan, stirring with a whisk until smooth. Pour the cream cheese mixture evenly over pierogies. Top evenly with cheddar cheese.
Bake for 20 minutes or until bubbly and thoroughly heated. Remove from oven, and sprinkle with green onions, tomato, and pepper. Put back in the oven and cook for another 10 minutes. Serve.
Note - if you want a saucier dish, double the sauce ingredients (garlic, cream cheese, broth and cheese).
Friday, July 27, 2012
Recipe Swap - Chili Lime Tofu with Rice and Spinach
I have a food confession. Until I made this recipe I had never cooked tofu. I'd eaten it a handful of times, mainly when my vegetarian aunt visits and we get Chinese food to share. I was missing out.
I've mentioned several times that I'm trying to cook healthier meals, but lately we've been tossing around the idea of going mostly vegetarian. We won't cut out all meat, but we've decided to make a concerted effort to eat meat less often, maybe twice a week. This goes for everything from red meat to chicken.
Enter the humble tofu. All I really know about tofu is that it tastes like whatever you cook it in. I've had my eye on this Chili Lime Tofu with Rice and Spinach for awhile now, so when it was submitted for the last recipe swap I knew I had to make it. As luck would have it, I was given Stefanie's blog for this swap and the stars aligned. Stefanie really enjoyed the dish and Heather, the blogger that gave the recipe to Stefanie, loves it so much so that she puts it on her weekly menu every other week. That's a serious recommendation, so I figured what better recipe to try for my first tofu experience.
We loved this. Absolutely loved it. SP said if this is the kind of stuff he needs to be eating to stay healthy it wouldn't be as hard as he thought. The flavors from the sauce were outstanding. I doubled the sauce and I'm glad I did. There wouldn't have been nearly enough otherwise. The crispy tofu was delicious, although we decided I needed to cut the slices thicker. The thinner pieces were too chewy while the thicker ones were just right.
I also had a minor mishap with the tofu due to my own ignorance of how to prepare it. I started slicing the tofu, marveling at the amount of water that was coming out of the brick and wondering how it was going to get crispy in the skillet. Then I reread the directions and realized I needed to press and drain it. A quick Google search led me to instructions. I've added the steps to the ingredient list below for other tofu novices.
Chili Lime Tofu with Rice and Spinach
As seen on Kickin It in the Kitch, originally from Hezzi-D’s Books and Cooks
1 cup jasmine, basmati or white rice
1 1/2 cups water
1/2 teaspoon salt
2 limes
1 teaspoon nutmeg
2 tablespoons sugar
6 tablespoons soy sauce
2 teaspoons garlic chili pepper sauce
4 cloves garlic, minced
1 package extra-firm tofu
2 cups fresh spinach
1 tablespoon sesame oil
2 garlic cloves, minced
In a medium sized saucepan combine the rice, water, salt, zest of 1 lime, and nutmeg. Cook according to the package directions.
In a small bowl combine the sugar, soy sauce, garlic chili pepper sauce, garlic cloves, and juice of both limes. Mix well and set aside.
Unwrap the tofu. Place on a plate lined with 4 paper towels. Cover with 4 more paper towels and weigh down with a plate or skillet topped with heavy cans. Allow to press and drain for 30 minutes - 1 hour. Once drained, slice the tofu into 4 slices lengthwise. Cut each rectangle in half then each square into two triangles. Spray a skillet with cooking spray and cook the tofu for 10 minutes on each side or until it is golden brown.
Lower the heat and pour the chili lime sauce over top of the tofu. The sauce will bubble up, reduce, and form a glaze. Watch carefully so the glaze doesn't become too thick. Remove from heat once the sauce is at your desired consistency.
In a medium pan sauté the spinach, sesame oil, and garlic. Cook for 5 minutes or until the spinach is wilted but still green. Serve the rice topped with spinach with the tofu on top.
Wednesday, July 25, 2012
Black Bean Burgers with Avocado Basil Cream
I had two more Black Bean Burgers in the freezer and wanted an easy, no-fuss dinner for the end of the week. I had seen this Avocado Basil Cream on How Sweet It Is so I thought I'd give it a whirl.
Please forgive the photos. I thought I'd try my hand at those staging shots so many bloggers do with the ingredients and the finished product. I even edited both of these photos in PicMonkey, although I doubt you can tell. My photography is a work in progress, that's for sure.
Anyway, on to the cream. It was delicious but I did modify it a bit. I've been burned before by avocado creams that have way too much sour cream, so much that you can't taste the avocado anymore. I was worried that this recipe had too much and since I was only using half an avocado to begin with I decreased the sour cream substantially. I also added lemon juice because I felt it needed a little something to brighten and lighten it up. It was delicious paired with the black bean burgers.
A funny story - Baby Girl insists on helping me in the kitchen these days (not that I'm complaining, I love it) and I also want her to taste and smell the ingredients. I offered her avocado, which she declined, but as soon as I opened the sour cream she asked for a taste. I ended up spoon feeding her at least 1 tablespoon of sour cream before I cut her off. First lemons and now sour cream? The kid is weird.
Avocado Basil Cream
Modified from How Sweet It Is
1 tablespoon sour cream
1 avocado, chopped
10 medium basil leaves, chopped
1/4 teaspoon salt
Pinch of pepper
Lemon juice, to taste
Add sour cream, avocado, basil, a pinch of salt and pepper to a food processor, blending to combine. Once somewhat smooth, add lemon juice, blending a bit and then tasting. Keep tasting and seasoning until you're happy.
Monday, July 23, 2012
Recipe Swap Roundup - Vegetarian Part 2
Nicole isn't usually a fan of eggplant, but this Spicy Eggplant hit the spot after a long day:
I was skeptical of the blue cheese in tomato sauce but my Pasta with Tomato-Blue Cheese Sauce ended up being delicious:
Heather enjoyed how the flavors blended together in her Zucchini, Squash, and Tomato Gratin:
Dawn's Summer Vegetable Pie was the essence of summer in a pie:
Elisha isn't normally a fan of quinoa but she ended up really liking her Quinoa with Roasted Garlic, Tomatoes, and Spinach:
Christine loves spinach and artichoke dip but felt her Spinach and Artichoke Stuffed Portabellas was missing a little something, though nothing a little tweaking can't fix:
Nichole loved her Sauceless Garden Lasagna despite the fact that her husband won't eat zucchini or tomatoes:
Lindsay was excited when she saw Black Bean Patties with Corn Relish and Avocado Cream in her Inbox. They turned out to be delicious:
Kate was worried that making Homemade Manicotti would be too difficult but it was surprisingly easy and tasty:
Stefanie really enjoyed her Chili Lime Tofu despite being nervous about cooking tofu:
Ali made Jaida's Black Bean and Avocado Quesadillas. She doesn't have a blog so here is her review: I enjoyed this quesadilla. I cooked it on my panini press rather than in the pan. I find that it just cooks faster and crispier. Overall a great recipe that I'll make again but I will add something else for texture. I didn't add anything this time as I didn't want to change the recipe but perhaps some grilled chicken or crisp peppers. It needed some texture on the inside as the combination of avocado, black beans and cheese is pretty uniform. Delicious none the less and a fun first swap!
Mary Ellen was happy to find a healthier recipe for Lightened-up Eggplant Parm
Jenni also made Eggplant Parmesan, although this version isn't breaded:
Jenna used her Black Bean and Corn Dip to make tacos with sweet potatoes:
Jaida's Warm Chickpea Salad was a great light lunch:
Jey loves burgers and her Black Bean and Corn Burgers were a hit:
Nicole had to turn her enchiladas into a Veggie Enchilada Bake, but the flavors were still great:
Kristina wasn't able to use round pasta for her aptly named dish, Round Pasta, but she still enjoyed it:
Ashley enjoyed her Black Bean Salsa as a light summery salsa:
Friday, July 20, 2012
Roasted Tomato, Mozzarella and Arugula (or Spinach) Sandwich
The recent burger/sandwich swap had so many wonderful sandwich recipes I felt I needed to try ASAP, like this Roasted Tomato, Mozzarella and Arugula Sandwich. I knew it would be a perfect light dinner and even though it isn't technically a caprese sandwich, all the flavors were there with the addition of the peppery arugula. Except SP came home with baby spinach instead of arugula, so I had to make the substitution. I still want to try this with arugula but the spinach also worked well.
I absolutely loved this sandwich. I roasted the tomatoes during the day so all I had to do was reheat them and assemble the sandwiches. I thought the tomatoes still looked a little undercooked at 30 minutes, so I ended up cooking them for an hour. As you can probably tell from the photo, the tomatoes became almost like a tomato jam, falling apart completely after I smashed them with the potato masher, making this a messy but delicious sandwich. I removed the skin because I can't stand loose tomato skin, which was very easy to do after smashing the tomatoes.
This is a fantastic sandwich that we both loved. I'll definitely be making it again.
Roasted Tomato, Mozzarella and Arugula (or Spinach) Sandwich
As Seen on Kate’s Recipe Box
12 ounces plum tomatoes, halved
1 tablespoon olive oil, plus more for drizzling
1 teaspoon balsamic vinegar
Thyme sprigs, chopped
Salt and pepper
4 thick slices crusty bread
5 ounces fresh mozzarella, sliced
Basil leaves
1 cup arugula (or spinach)
Heat oven to 400F degrees. Lay tomatoes, cut side up, in a roasting pan and drizzle with 1 tablespoon olive oil, the balsamic vinegar and thyme. Season with salt and pepper and roast for 30-45 minutes. Allow the tomatoes to cool and then smash with a potato masher. If you don't like tomato skins, remove the skin after smashing.
To assemble the sandwiches, toast the bread until golden. Smash the tomatoes with a potato masher to flatten. Divide bread between two plates and top with the tomatoes. Scatter on mozzarella, basil leaves and arugula. Drizzle with olive oil and serve.
Thursday, July 19, 2012
Skillet Penne with Chicken and Broccoli
I've mentioned before how much I love one-pot dishes, especially when they involve cooking pasta in broth and water. There's something special about pasta cooked in a skillet with so many other delicious ingredients. The pasta soaks up not just the water and broth but the flavors as well.
This Skillet Penne with Chicken and Broccoli is from Cook's Country, which is one of the only magazines I continue to pay for. The recipes are tested so many times that I've rarely comes across one that isn't a winner. This was no exception. The sauce was a little thin, but I only had 7 ounces of ziti so that may have had something to do with it. I'm sure the leftovers the next day were better, but since there was only enough for SP I couldn't tell you. :) He's a lucky man - the flavors in this were outstanding. You can't go wrong with chicken, pasta and broccoli in my book.
Skillet Penne with Chicken and Broccoli
As seen in Cook's Country August/September 2012
1 pound boneless, skinless chicken breasts, sliced thin
Salt and pepper
2 tablespoons olive oil
1 onion, chopped fine
6 garlic cloves, minced
1/4 teaspoon red pepper flakes
1/4 teaspoon dried oregano
1/2 cup dry white wine
2 1/2 cups water
2 cups low-sodium chicken broth
8 ounces penne
8 ounces broccoli florets, cut into 1-inch pieces
2 ounces Parmesan cheese, grated, plus extra for serving
Pat chicken dry and season with salt and pepper. Heat 1 tablespoon oil in a 12-inch non-stick skillet over medium-high heat until just smoking. Add chicken in a single later and cook, without stirring, until beginning to brown, about 1 minute. Stir chicken and continue to cook until nearly cooked through, about 2 minutes. Transfer to a bowl and keep warm.
Add 1 tablespoon oil to now-empty skillet and heat over medium heat until shimmering. Add onion and 1/2 teaspoon salt and cook until softened, about 5-7 minutes. Stir in garlic, pepper flakes and oregano and cook until fragrant, 30 seconds. Stir in wine and simmer until nearly evaporated, 1-2 minutes. Stir in water, broth and penne. Increase heat to medium-high and cook at a simmer, stirring often, until penne is nearly tender, about 12 minutes.
Stir in broccoli and cook until penne and broccoli are tender and sauce has thickened, 3-5 minutes. Stir in chicken, along with any accumulated juices and cook until warmed through, about 1 minute. Off heat, stir in Parmesan cheese. Season with salt and pepper to taste. Serve immediately.
Wednesday, July 18, 2012
Parmesan Tilapia with Roasted Tomatoes
We don't eat enough fish, especially since we discovered we just don't like salmon. In an effort to continue eating healthier, I've been on the lookout for fish recipes that don't sacrifice flavor. Enter this recipe for Parmesan Tilapia that's been circulating on my favorite food blogs for awhile now.
It may seem like Parmesan, mayo and butter on top of fish negates any healthy properties this recipe might have, but you're using so little of each and spreading it over 4 filets. I wanted to cut the richness of the topping while using up a few grape tomatoes that needed to be eaten, so I added a roasted tomato and basil topping. It was the perfect accompaniment, light and summery and packed with delicious tomato flavor.
Since I've never used my broiler (mine isn't in my oven) I just baked the fish. The topping didn't get brown and bubbly, but the flavor was still amazing, especially when paired with the roasted tomatoes. This is a simple, delicious meal that takes practically no time to make. I served it with roasted asparagus that cooked alongside the fish. Perfection.
Parmesan Tilapia with Roasted Tomatoes
Modified from Mrs. B Cooks, as seen on The Way to His Heart
1 pint grape tomatoes
1 tablespoon olive oil
Salt and pepper
1/4 cup basil leaves, lightly packed, finely minced
1 lb tilapia filets
1/4 cup Parmesan cheese, shredded
2 tablespoons butter, softened
1 tablespoon mayonnaise
1 tablespoon lemon juice
1 teaspoon minced fresh garlic
1/4 teaspoon dried Italian seasoning
1/8 teaspoon onion salt
Ground black pepper to taste
Pre-heat the oven to 350. Toss tomatoes with olive oil, salt and pepper. Place on a baking sheet and roast for 30 minutes until soft. Allow to cool slightly, then remove skins (optional). Toss in a bowl with the minced basil and any juice from the baking sheet.
Switch on the broiler or keep the oven at 350. Line a baking pan with foil and spray with cooking spray. Arrange tilapia filets in a single layer on baking pan. Broil a few inches from heat for 2 to 3 minutes, or cook for 8 minutes. Flip the filets over and broil for an additional 2 minutes (only do if broiling).
In a small bowl, combine the Parmesan cheese, butter, mayonnaise, lemon juice, garlic, Italian seasoning, onion salt, and pepper. Mix well and set aside.
Remove the fish from the oven and cover filets with Parmesan cheese mixture on the top side. Return to broiler and continue cooking until the top is lightly browned and the fish flakes easily with a fork. If baking, cook another 8 minutes. Remove the fish from the oven. Place one filet on each of 4 plates and top with some of the roasted tomatoes. Serve immediately.
Tuesday, July 17, 2012
Spinach and Cheese Stuffed Portabellos
I'm particularly proud of this recipe for a number of reasons, the main one being SP absolutely loved it. Now, I did kind of stack the deck with a stuffed mushroom because the man loves, loves, loves mushrooms, but it's still a vegetarian meal. Despite needing to eat less meat/eat healthier he's not exactly thrilled by all these changes to his diet.
The other reason I'm so proud is because I had to modify this recipe, the original being Lasagna-Stuffed Portabellos. I had half a container of ricotta in the fridge that I assumed would be OK. When I opened it, however, I realized it had gone rancid. Not a good smell. I decided to forge ahead by wilting the spinach I'd planned to serve on the side and add it to the filling. I was worried these would be too dry but they were perfect. I didn't even miss the ricotta, whose absence made this a much healthier meal. Score!
Spinach and Cheese Stuffed Portabellos
Inspired by Pink Parsley
4 cloves garlic, minced and divided
1/2 teaspoon Italian seasoning, divided
2 tablespoons olive oil
kosher salt and freshly ground black pepper
4 portabello mushroom caps
1 bag baby spinach
1/4 cup Parmesan, plus 2-3 tablespoons for sprinkling over mushrooms
4 oz. fresh mozzarella, divided
2 tablespoons chopped fresh basil
1/4 cup breadcrumbs
About 1 cup marinara sauce
Preheat the oven to 425 degrees. Use a butter knife to scrape the gills out of the mushroom caps.
In a small bowl, combine 1 clove minced garlic, 1/4 teaspoon of the Italian seasoning, olive oil, and salt and pepper to taste. Brush the inside and outside of the caps with the mixture, and roast cap-side down for about 10 minutes. If the mushroom gives off water, blot it up with a paper towel.
Meanwhile, heat a skillet over medium heat. Add 1 teaspoon oil and 2 cloves minced garlic. Once the garlic is fragrant, add the baby spinach and cook, stirring often, until wilted. Allow to cool slightly, than drain off the liquid.
in a medium bowl stir together 1 clove minced garlic, Italian seasoning, Parmesan, 3 ounces of mozzarella, basil, breadcrumbs and wilted spinach. Season with salt and pepper to taste.
Spoon about 2 teaspoons of the marinara into each mushroom cap, then stuff with the spinach mixture. Spoon about 1-2 teaspoons of sauce over the ricotta, then sprinkle the remaining Parmesan and mozzarella over the sauce.
Bake 10-15 minutes, or until the filling is heated through and the cheese has melted. Serve with additional marinara.
Monday, July 16, 2012
Cuban Burger
If I had to pick a favorite sandwich it would be these Cuban Sandwiches. I love all the complex flavors working together. It's a recipe I've made over and over again for years and never get tired of it. When Ashley submitted these Cuban Burgers for the burger/sandwich recipe swap I knew I had to try them. A burger form of my favorite sandwich? Yes, please!
I left out the lime zest and juice because I don't equate that flavor when I think of Cuban sandwiches. Since I add banana peppers to my Cuban sandwiches I decided to mince some and add them to the meat. They imparted great flavor and were easier to eat that way. SP said the pork was less flavorful than he would have liked, so I modified the recipe below to include sage and rosemary, two herbs that are featured in the roast pork recipe that the Cuban sandwiches are derived from.
These are a delicious burger and a fun change from the traditional sandwich.
Cuban Burger
Modified from Cheese Curd in Paradise
1 1/2 lbs ground pork
2 tablespoons minced banana peppers
1 teaspoon cumin
1 garlic clove, minced
1 teaspoon fresh oregano, chopped (or dried)
1 teaspoon fresh sage, minced
1 teaspoons fresh rosemary, minced
1/2 teaspoon salt
1/2 teaspoon black pepper
4 slices smoked ham
4 slices Swiss cheese (or provolone)
4 teaspoons mayo
4 teaspoons yellow mustard
Pickles
4 hamburger buns
Mix the banana peppers, cumin, garlic, oregano, sage, rosemary, salt and pepper into the pork. Form the pork into 4 patties about 3/4 of an inch thick. Press your thumb into the center of the patty to form an indentation (this will prevent the burger from turning into a circle as the meat contracts during cooking). Broil or grill the burgers until cooked, about 5-6 minutes per side. Top with ham and Swiss and place under broiler until cheese is melted (about 1-2 minutes). Place burgers on buns and top with mayo, mustard, and pickles.
Sunday, July 15, 2012
Weekly Menu - Week of July 15, 2012
How are we halfway through July already? I don't want this summer to go by too quickly. I don't feel like we've had enough summer fun yet. I need more time to go down the shore, have BBQs, go swimming, go to a carnival or two.
I'm trying very, very hard to limit the amount of meat we eat in addition to eating healthier. This week's menu was tough to do because I have so many recipes printed out to make. Gah! How am I ever going to get through them all?
Saturday - Chili Lime Tofu with Basmati Rice and Spinach
Sunday - Chicken Pepperoni Burgers, corn on the cob
Monday - Bacon and Broccoli Pierogie Bake
Tuesday - Hoagies
Wednesday - Tilapia Francese over Spaghetti, steamed broccoli
Thursday - Black Bean Burgers with Avocado Basil Cream, Cheesy Zucchini Rice
Friday - something from the freezer
Friday, July 13, 2012
Recipe Swap: Pasta with Tomato-Blue Cheese Sauce
I have a confession to make.
When I swapped the recipes and ended up with Ashley's Pasta with Tomato-Blue Cheese Sauce I was worried. I've had my eye on this recipe for a long time but I didn't think SP would like it. I'd run it by him once before and he said, "Blue cheese in tomato sauce? No." I considered making this just for myself but this week was absolutely jam-packed due to the holiday and other commitments, so I bite the bullet and put it on the menu for Sunday dinner.
I knew this wouldn't take long to throw together, so about an hour before we were planning to eat I went looking for the blue cheese crumbles in the fridge. And couldn't find them. I asked SP where they were and he smacked his forehead and said, "Oh shoot, I forgot to go back for them." This started a lengthy conversation about whether blue cheese would go with the tomatoes in the sauce and finally SP decided that I should follow the recipe as it was written and worst case scenario we'd get take out. Off he went to the grocery store for the blue cheese while I got the rest of the ingredients together.
I'm happy to report that not only did this dish come together in the time it took to cook the pasta, we both loved it. SP even mentioned adding more red pepper flakes the next time I make it, implying that there will be a next time!
I decided to make a few modifications, mainly to lighten it up a bit. I subbed half-and-half for the heavy cream and used the reserved tomato juice from the diced tomatoes to thin the sauce. The blue cheese was a 4-ounce container and I started with about 2 ounces, then tasted the sauce. I didn't want the blue cheese to overwhelm the other flavors. That was just the right amount for us, with a few more crumbles added to my plate for the photo. I HIGHLY recommend adding a little and tasting, then adding more if you want it. Remember, you can always add more but you can't take it away. A dash of red pepper flakes added a slight heat to the dish, but you can always add more to suit individual tastes.
I'm so happy this was a success. Even Baby Girl loved her "pasketi" for dinner and ate her whole serving. I usually find myself with leftover blue cheese and this is a simple pantry dish I can throw together anytime. Thank you, Ashley, for getting us to try something new!
Pasta with Tomato-Blue Cheese Sauce
Slightly Modified from the Pioneer Woman, as seen on Cheesecurd in Paradise
1-1/2 pound angel hair or thin spaghetti
2 tablespoons olive oil
4 cloves garlic, minced
1 28-ounce can diced tomatoes, drained, juice reserved
Dash of sugar
Salt and freshly ground black pepper
Crushed red pepper flakes, to taste
1/4 - 3/4 cup crumbled blue cheese, to taste
1 cup half-and-half
Reserved tomato juice, for thinning
4 cups baby spinach
Cook pasta according to package instructions. Drain and set aside.
In a large skillet over medium heat, add olive oil. When hot, add minced garlic and cook for a minute. Pour in drained tomatoes, sugar, salt, pepper, and crushed red pepper to taste. Cook for 10 minutes, stirring occasionally.
Reduce heat to low. Add half-and-half and stir, then add in crumbled blue cheese, starting with 1/4 cup and tasting the sauce before adding more. Add some of the reserved tomato juice if sauce is too thick. Cook for a minute or two, tasting and adding more seasonings as needed.
At the last minute toss in spinach. Immediately toss in the cooked and drained pasta. Serve immediately.
Thursday, July 12, 2012
BLT Wraps
One of SP's favorite sandwiches in a BLT. As much as I love a traditional BLT on white bread, it can be a messy sandwich to eat. Enter the BLT Wrap. All the flavors of a BLT but wrapped snugly in a tortilla.
I ended up making these for dinner on Friday so I cut the recipe in half since we wouldn't need leftovers. These were incredibly easy to make, although I did have a minor mishap with the bacon. The original recipe calls for cooking the bacon in the microwave but my bacon wasn't cooking properly so I finished it in the toaster oven. I recommend cooking the bacon in either the toaster oven or regular oven for more even cooking.
BLT Wraps
Slightly Modified from Cook's Country, August/September 2012
12 ounces thick-cut bacon
1/4 cup mayonnaise
1 tablespoon Dijon mustard
2 romaine lettuce hearts (12 ounces), leaves trimmed to 8 inches long
1 pint cherry tomatoes, halved
4 (10-inch) flour tortillas
Cook bacon until crispy.* Allow to cook slightly then chop into bite-size pieces.
Whisk mayonnaise and mustard together in large bowl until combined. Add lettuce and tomatoes and toss to coat evenly with dressing. Lay tortillas on counter and divide lettuce, tomatoes, and bacon among tortillas. Roll tightly and serve.
*I like to use the toaster oven but for this amount of bacon I recommend using the oven. Preheat to 350 degrees and line a baking sheet with tin foil for easy clean-up. Place a cooling rack on the baking sheet and lay the bacon on the rack. Cook until desired crispiness, checking often to make sure the bacon isn't burning.
Wednesday, July 11, 2012
Artichoke and Salami Sandwiches
Working from home has some challenges I never expected, like the temptation to go out for lunch. When I worked in an office I rarely bought lunch. At my last job there simply wasn't anywhere to go except a dirty deli next door that always seemed to make me sick when I ate there. But even if there had been options I preferred to save my money. Now that I'm home, with a fully stocked pantry and refrigerator at my disposal, the urge to go out is powerful. I usually feel the pull on Fridays when I know the local farmers market is open and my favorite falafel stand is calling my name.
Last Friday I found myself starving at 11:30am without any leftovers for lunch. That's usually when I grab my keys and head out the door, but that day I decided to get creative. I knew we had leftover salami and artichokes from the antipasti pasta salad. A quick Google search lead me to this Artichoke and Salami Sandwich. I was sold when I saw the artichoke and basil spread and, as luck would have it, I had every ingredient listed in my pantry, on my patio or in my fridge.
I can't say enough good things about this sandwich. In fact, I might need to keep salami and provolone on hand so I can make it whenever I have a craving. The artichoke spread is addictive for anyone who, like me, has an artichoke obsession. I left out the red pepper flakes because I didn't want the heat but I'm sure it would go well with the tang from the lemon and the earthiness of the basil. Slathered on toasted bread, it becomes a great glue for the cheese, meat and spinach.
This is a simple sandwich that feels like something you'd order in a gourmet sandwich shop. A perfect, light lunch.
Artichoke and Salami Sandwiches
As seen on Serious Eats
Serves 4
For the Artichoke-Basil Spread
One 14-ounce can artichoke hearts, drained and rinsed
1/4 cup fresh basil leaves, chopped
2 tablespoons mayonnaise
1 tablespoon fresh lemon juice
1/4 teaspoon crushed red-pepper flakes (optional)
Salt and pepper
For the Sandwiches
8 thick slices country bread
4 ounces fontina or provolone cheese, thinly sliced
1/2 bunch spinach, stems trimmed
4 ounces hard salami, thinly sliced
For the artichoke-basil spread: Add the artichoke hearts, basil, mayonnaise, lemon juice, and red pepper flakes to a food processor. Pulse until smooth. Season to taste with salt and pepper.
For the sandwiches: Top each slice of bread with some of the artichoke-basil spread. On half of the slices, add a quarter of the cheese, spinach, and salami. Top each with a remaining slice of bread, spread side down. Serve.
Tuesday, July 10, 2012
Cantaloupe and Mozzarella with Prosciutto and Basil
I love proscuitto and cantaloupe. Such a great flavor combination with the sweetness from the melon and the saltiness of the ham. While looking through my recipes for another side dish for July 4 I found this one for Cantaloupe and Mozzarella with Prosciutto and Basil.
It's a gorgeous platter of food and another side dish that requires minimal effort to put together. No cooking required, which was great since the temps were topping out in the high 90s that day. I cut up the melon the night before (Baby Girl loved watching me and helped by holding the container I was using to store the pieces until the next morning), so the day of all I had to do was assemble the platter. Easy peasy.
Cantaloupe and Mozzarella with Prosciutto and Basil
As seen in Everyday Food
1 cantaloupe, halved and seeded
3/4 pound bocconcini (bite-size fresh mozzarella balls)
2 tablespoons extra-virgin olive oil
1/4 teaspoon red-pepper flakes (l omitted because we had kids eating this)
Coarse salt and ground pepper
1/3 pound thinly sliced prosciutto
1/4 cup fresh basil leaves, torn
With a large melon baller, scoop melon flesh into a large bowl (or cut into bite-size pieces). Add bocconcini, oil, and red-pepper flakes (optional); season with salt and pepper and stir to combine. Arrange prosciutto along edges of a large serving platter. Stir basil into melon mixture, transfer to center of platter, and serve.
Monday, July 9, 2012
Antipasti Pasta Salad
I know the 4th of July has come and gone (I'll need to remember to do some kind of roundup before the holiday next year), but there are still plenty of cookout days left this summer. And if you aren't a big fan of creamy (read: mayo-based) pasta salads, this one has your name written all over it.
We invited our friends C & D over on July 4. They brought their two sons and all three kids had a blast running through the sprinkler and dunking themselves in the pool. Toddlers are the best, aren't they? While the kids played and tore apart our house, the adults gorged themselves on delicious food. Over time I've learned that D is a picky eater. He's an Italian who doesn't like raw tomatoes. Yeah. I know. But in the time I've known him I've come to learn what things he'll like and this Antipasti Pasta Salad was right up his alley.
As soon as they got to our house and I unveiled the pasta salad, D grabbed a plate and piled it high with big, heaping spoonfuls of this pasta salad. And then cleared his plate. I think he alone ate half the bowl. It always makes me smile when company likes my cooking.
This couldn't have been simpler to make. All the ingredients are ready to eat so the only cooking you're doing is making the pasta. I cut up all the add-ins the night before so all I had to do was cook the pasta and toss everything together to let it chill for a few hours. Simple and extremely delicious. We all gobbled this up but thankfully it makes a ton of food so there was plenty to send home with D in addition to serving as a side dish for the next night's meal.
Antipasti Pasta Salad
As seen in Everyday Food
Coarse salt and ground pepper
3/4 pound short twisted pasta, such as campanelle
4 ounces fresh mozzarella or bocconcini, cut into 3/4-inch pieces
2 jarred roasted red peppers, drained and cut into 1/2-inch strips
8 large pitted green olives, sliced crosswise
10 artichoke hearts, quartered
1/2 small red onion, thinly sliced lengthwise
2 ounces thinly sliced salami, slices quartered
2 tablespoons red-wine vinegar
4 teaspoons extra-virgin olive oil
1 cup lightly packed fresh parsley leaves, chopped
In a large pot of boiling salted water, cook pasta according to package instructions. Reserve 1/2 cup pasta water; drain pasta. Return pasta to pot and stir in mozzarella, peppers, olives, artichoke hearts, onion, salami, vinegar, oil, and reserved pasta water. Season to taste with salt and pepper. Top with parsley and serve warm or at room temperature.
Note: Try this pasta dish with other antipasti ingredients such as tuna, provolone, anchovies, artichoke hearts, capers, or marinated mushrooms.
Sunday, July 8, 2012
Weekly Menu - Week of July 8, 2012
I hope everyone enjoyed their 4th of July and wasn't too confused by the mid-week holiday. I'm still undecided about whether it was a good thing or not having it on a Wednesday. Part of me was happy for a break in the middle of the week but it sure felt like we had two Mondays that week. But then Friday felt like it came extra quick, so that was good. See, still undecided.
I've got a fantastic menu planned for this week. I'm very excited about everything I'm making and it was super simple to throw this menu and shopping list together. I love when that happens.
UPDATE: The meal plan has already gotten thrown by the wayside due to heat and extreme eating at a birthday party. I've revised the menu (more for myself so I know what I need to cook).
Monday - Cuban Burgers, fries
Tuesday - Roasted Tomato, Mozzarella and Arugula Sandwiches (although SP bought spinach instead of arugula so I'll need to modify the sandwiches)
Wednesday - Parmesan Tilapia, asparagus
Thursday - Lasagna-Stuffed Portobellas, arugula salad
Friday - Skillet Penne with Chicken and Broccoli
Thursday, July 5, 2012
Creamy Macaroni Salad
I told you it wouldn't be long before I posted another recipe for macaroni salad.
I love a good, creamy macaroni salad so when our friends C & T invited us over for lunch last weekend I jumped at the chance to bring this traditional summer side dish. I had torn out this recipe for Creamy Macaroni Salad from Everyday Food so I thought I'd give it a try. I liked that the main ingredient in the dressing is yogurt instead of mayo, which not only makes it lighter but healthier.
I've never been able to find 8-ounce containers of yogurt in the grocery store. I'm not sure why recipes call for it. All I can find are 6-ounce containers, so I ended up using mayo to make up the difference. Since SP thinks of celery and carrot when he thinks of macaroni salad, I subbed shredded carrot for the radishes in the original recipe. I made this the night before so it chilled overnight. I think it would have done well with a little water or milk to thin it out before I served it, but even without that we all loved this recipe. That huge bowl was almost empty after only 4 adults chowing down. The yogurt and lemon added a wonderful tang and lightness to a dish that's traditionally very heavy and gloppy. The carrot and celery combo was perfect. This is definitely going to be my go-to macaroni salad from now on.
Creamy Macaroni Salad
Modified from Everyday Food
Coarse salt and ground pepper
1/2 pound elbow macaroni
2 hard-cooked large eggs, whites roughly chopped, yolks left whole
1 cup low-fat plain yogurt
1 tablespoon mayonnaise
1 tablespoon fresh lemon juice
2 carrots, peeled and shredded
2 celery stalks, thinly sliced crosswise
2 tablespoons finely chopped dill pickle
2 tablespoons chopped fresh chives (I left this out)
In a large pot of boiling salted water, cook pasta according to package instructions. Drain and return to pot. In a small bowl, finely mash 1 egg yolk with a fork (reserve remaining yolk for another use). Add yogurt, mayonnaise, and lemon juice; stir until smooth. Add to pasta, then stir in egg whites, radishes, celery, and pickle. Season with salt and pepper. Sprinkle with chives just before serving. Thin with milk or water before serving, if needed.
Wednesday, July 4, 2012
Recipe Swap Roundup - Burgers/ Sandwiches Part 2
Happy 4th of July! I hope everyone is having a safe, happy and delicious holiday. As we celebrate our nation's independence, many of us will be grilling burgers with friends and family. Who doesn't love a good burger or sandwich? I don't know many people. I also love sandwiches, especially when they're simple to put together. They can make an excellent weekday meal and the options are endless.
Kate made a Roasted Tomato, Mozzarella and Arugula Sandwich, which packed a ton of flavor for minimal effort:
Nicole has a new favorite burger, these Chicken Marsala Burgers:
Jenna thought her Bombay Sloppy Joes were a great introduction to Indian flavors:
Heather loved the crispy, light flavors in her Graceland Eggplant Sandwiches
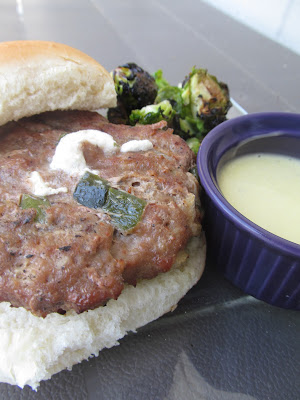
Cara, a newcomer to the swaps, loves burgers but rarely makes them at home. These Cream Cheese and Poblano Stuffed Turkey Burgers were moist and flavorful:
Melissa loves burgers but her husband isn't a fan so she made her Teriyaki Turkey Burgers for lunch:
Christine's Pulled Hawaiian Chicken Sandwiches exceeded her expectations:
Nichole wasn't sold on her Mar-a-Lago Turkey Burgers, but was happy she tried them:
Lishie enjoyed her Grilled Honey Orange Chicken Sandwiches made with oranges instead of the original tangerines:
Dawn received a simple grilled burger recipe for the swap so she turned it into Sliders and learned that less is definitely more when it comes to burgers:
Coleen was excited to try her Island Burgers with Pineapple-Lime Salsa, which she absolutely loved:
Katie's Pork Sandwiches were so flavorful they didn't even need the slaw in the original recipe:
Jen, another swap newcomer, loves Greek flavors so her Greek Turkey Burgers were a huge hit:
Swap newcomer Stefanie loved her Cuban Burgers:
Jaida's Spicy Pepper Jack Burgers were right up her alley:
Nicole really enjoyed the complex flavors of her Southwest Turkey Meatball Subs with Creamy Cilantro Sauce:
My Balsamic Caprese Panini was messy but so delicious:
Jey's Horseradish Havarti Burgers were a great summer treat:
Kristina ended up making the chicken for her Buffalo Chicken Wraps in the crockpot to save time:
Ashley modified her recipe into Grilled Shrimp Po'Boys, a great twist to the traditional fried shrimp:
Jenni's Prosciutto TBM Sandwich was simple but delicious:
Ammie had some minor mishaps with her Crockpot Pulled Pork, but it all came out delicious in the end:
Subscribe to:
Posts (Atom)